C(1)-H(3) 1.113 1.113
C(1)-H(4) 1.113 1.113
O(2)-C(1)-H(3) 121.266 120.300
O(2)-C(1)-H(4) 121.266 120.300
H(3)-C(1)-H(4) 117.464 116.500

Experiment 11
VSEPR and Lewis Structures (Day 1)
View information on VSEPR Theory of Molecular Geometry Pages online. These suppplemental pages describe what VSEPR is, and how to use VSEPR to make molecular models, how to predict molecular shapes (molecule geometry), and how to predict molecule polaity, based on the number of electron domains and their arrangement around the center atom. Please note, that an electron domain is a single electron region, a pair of electrons (either lone pairs or bonded pairs), multiple pairs of electrons (such as double and triple bonds).
In order to get correct VSEPR results, you must draw Lewis Dot structures. Follow the procedures below to draw correct Lewis structures:
You should print a figure using VSEPR to predict molecule geometry (shape), polarity, and electron domain arrangments for molecules having Three to Six Electron Domains. This table is more complete than the table found in your experimental protocols.
The following worksheets must be printed prior to coming to the first lab period for this experiment:
Computer Modeling (Day 2)
Today, we will complete VSEPR Worksheet 2. Before you make models, your instructor will check your Lewis Dot Structures for correctness. Your instructor will also check to make certain you have listed the correct molecular geometry and whether the molecule (or ion) is polar (an ion is not necessarily polar!). Get your instructor's signature before making your models. You will need to make models for three structures on the first page and three structures on the second page (6 models total; you can make more if you desire). When the models are made, show them to your instructor.
Using Chem3D™ you will create computer models for the following compounds:
|
|
|
To start the Chem3D™ program, go to the "Apple" Icon in the upper left hard corner of the computer screen. Hold the mouse button down and scroll down to the Chem3D™ program. After you start the program, in the upper left hand corner of the program window, there is a text box where you can enter the formula of the compound you wish to model (you cannot model ions). You must use capital letters, in addition to the appropriate subscript numbers. Type in the formula for the compound (e.g., NH3 for ammonia) and hit the [RETURN] key ([ENTER] key on a PC) to display the compound in the display window. Select the rotation tool (the "globe-like" symbol), and, holding the mouse button down, you can rotate your molecular image. Rotate it until you have an image that you find visually pleasing.
Preference Settings: Under the "View" dropdown menu, select "Preferences." For Model Type, choose "Ball and Stick" and for Atom Fill, select "Pattern by Element."
You will analyze your molecule by choosing the "Analyze" drop down menu. Choose "Show bond lengths" and the calculated bond lengths will appear in a new window. Choose "Show bond angles" and the bond angles will appear in the same window as the bond lengths. Copy these values to the Microsoft Word document, setting up the page similar to the example shown by your instructor.
You will also need to copy your molecule image to the Word document. You may need to select the arrow tool before choosing the SELECT ALL option under Edit. Copy the molecular image to the Word document and paste it into the document. To resize and to move your image in the Word document, double-click on the image to get the Picture Toolbar (or go to View and select the Picture Toolbar link). Click on the Layout option (icon with a diamond in it) and choose "Square" which will now allow you to resize and to move the image. Make the image smaller by selecting one of the corners, and, while holding the mouse down, move the corner to make the image smaller. To move the image, click on the image and move it to the right side of the page, but horizontal to the bond length and angle data.
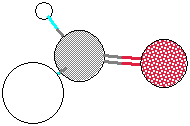
Be sure to add the name of the compound for each set of data and compound included in the Word document. You should arrange your data similar to the example shown below. On the left, it shows the bond lengths in Angstroms (Å) along with the actual and optimal bond angles. The example below is for formaldehyde.
| C(1)-O(2) 1.208 1.208 C(1)-H(3) 1.113 1.113 C(1)-H(4) 1.113 1.113 O(2)-C(1)-H(3) 121.266 120.300 O(2)-C(1)-H(4) 121.266 120.300 H(3)-C(1)-H(4) 117.464 116.500 |
 |
Repeat the above process for each of the six compounds listed above. Make certain all of your data is on no more than two pages. Print only one copy of your data. Make copies of your data to be included in your lab notebook. These data will be used during the lab exam, so they must be part of your lab notebook.
Go To Experiment:
1 2 3
4 5 6
7 8 9
10 11 12
Return to Chem110 Experiments Index