Experiment 6
Experiment VI: Titration Experiment Supplemental Protocols
Download and print the Titration Data Sheet before coming to class.
Outline of Experiment:
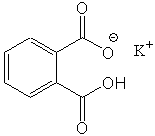
This instruction sheet describes how to prepare the NaOH solution you will use for all your titration experiments. In addition, this supplement explains how you will standardize your NaOH solution using KHP (potassium hydrogen phthalate) as your acid. The structure for KHP is shown below. Please not that it contains one hydrogen that is the acidic hydrogen, that you will titrate with your NaOH solution.
Once you have performed your manual titrations (NaOH and KHP) during the first lab, you will calculate the concentration of your NaOH solution for the next part of the experiment, which is the computer-assisted titration of acetic acid.
Day 1
Preparation of NaOH solution
Measure about 50 mL of the 1.50 M NaOH solution in a graduated cylinder (pour from the reagent bottle into a beaker, not the graduated cylinder!). Transfer the NaOH solution to a 500-mL plastic bottle. Rinse the graduated cylinder a couple times with distilled (deionized) water, adding the rinses to the plastic bottle. Add enough distilled water to have a final volume of about 500 mL, but it is not necessary to know the exact volume. Cap the bottle and mix thoroughly. (The solution will change composition if it is exposed to air, or glass bottles, so keep the bottle capped when you are not withdrawing samples and do not dispose of until the end of this entire experiment.)
Label the bottle with the names of the students in your group. After you have determined the average NaOH concentration, add this information to the label. After you are through with the experiments during the first day of lab, place the labelled bottle on the cart for storage until the next lab period.
Standardization of the NaOH solution
Weigh about 1.0 gram (but absolutely not more than 1.2 g) of KHP (KHP is an abbreviation for potassium hydrogen phthalate, not potassium hydrogen phosphorus) into each of three different clean (and labeled) 125 or 250-mL Erlenmeyer flasks (record the mass of KHP in each flask on the Titration Data Sheet1, which you must print yourself before coming to class). Make certain you know exactly how much KHP is added to each flask. Add about 40 mL DI water to each flask and with gentle swirling, mix until the KHP is dissolved. Do not use a stirring rod, as some of the KHP solution will adhere to the glass and affect your results. When you are ready to do the titration, add a small stirring bar into the flask and start stirring, but do not stir too vigorously to splatter liquid on the sides of the flask. If liquid splatters on the inside of the flask, use a wash bottle to rinse the chemical from the sides. Adding water does not affect your results, since you are measuring the amount of acid in solution, not the amount of water present.
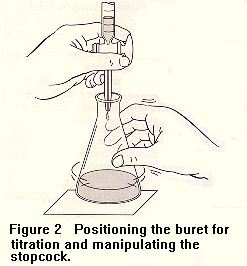
Place a clean and dry 50-mL buret in a buret clamp. If the buret is wet, you will need to rinse it out with a small amount of the NaOH solution. Add about 15 mL of your NaOH solution, and open the stopcock to make certain there is no air in the tip of the buret and that liquid flows from the buret. Fill the buret with your NaOH solution, although you don't need to be exactly at 0.00 on the buret. All readings should be to two decimal places. (10 mL is read and reported as 10.00 mL.) The bottom of the meniscus shows up better if a white card is held in back of the meniscus. Be sure your line of sight is parallel with the level of the meniscus. Before you begin your titration, make a notation of the volume reading for your NaOH solution. Remember, it does not need to be exactly at 0.00, but you need to make an accurate reading.
To each of your KHP solutions before you do the titration, add a couple drops of phenolphthalein solution as a color indicator. Phenophthalein is colorless in acid solution (pH<7.0), but turns pink in basic solution (pH>7.0). You will titrate each sample until a permanent, but faint, pink color appears in the stirring solution. The technique of titration is to manipulate the stopcock so that drops are dispensed, not a steady stream of liquid. As you get close to the titration end point (the pink color stays longer, but disappears with stirring), you should add your drops slowly, because one drop will make your solution go from colorless to a permanent pink color. When the solution stays pink, do not add any more NaOH. Observe and write down the final volume reading for this titration. The difference between the final volume and the initial volume is the amount of NaOH that you added.
Notes:
To read a buret, and to do a titration, the images below show you how.

Calculations
Calculate the molarity of the NaOH solution to four decimal places from the data from each titration. If the answers differ from each other more than ± 0.005 M, repeat the titration until you get consistent results. Average the results of the titrations, throwing out any values that differ by a large amount. Report your results to your instructor, and label the plastic bottle with your name, and molarity of the remaining contents.
This concludes your first day of experiment. The second day in the lab you will do titrations on acetic acid (from vinegar) and monitor the titration using the computer and LabWorks. Data collected during the second day will be analyzed on the third day of the lab. After your second day titrations are completed, you can dispose of the NaOH solution in the liquid waste container. Wash the plastic bottle completely and place it back on the cart, or return it to the stockroom. Dispose of the acetic acid too.
All data collected for all experiments (including the KHP calibrations) must be collected on the Titration Data Sheets. Please be careful and accurate in recording all your readings.
Procedures for analyzing your computer generated data will be discussed in lab. Follow the procedures outlined in the printed protocols.
Day 2
Today, you will use vinegar as the starting reagent. However, the concentration of acetic acid in vinegar is too high to be effectively titrated. Therefore, you will prepare a 10-fold diluted solution of vinegar (the dilute vinegar). You will use the dilute vinegar solution for your titration.
To prepare your solution of dilute vinegar, obtain about 30 mL of vinegar from the reagent cart. Using a 50-mL graduated cylinder, measure out precisely 25 mL of vinegar. Pour this vinegar into the 250-mL volumetric flask. Rinse the graduated cylinder several times with DI water, and add these washings to the volumetric flask. Swirl to mix the contents. Then, add enough DI water to the volumetric flask to be exactly 250 mL. Add the stopper and mix the contents well. You will use 50-mL quantities of this dilute vinegar in each of three different titrations.
To do the titration, add 50 mL of the dilute vinegar (using a clean 50-mL graduated cylinder) to a 250-mL Erlenmeyer flask. Add 1-2 drops of phenolphthalein2. Add a small stirring bar and place the flask on a stirring hot plate (do not turn on the heat). Add your previously prepared NaOH solution to the buret, filling it up to about the 0.00 marking, but the exact value is not important. Turn on the stirring switch and start the titration. It is best to add the NaOH dropwise, watching closely for when the solution turns and stays pink. When this occurs, you have reached your endpoint of the titration. Be sure to record both starting volume (close to zero) and ending volume (when titration is stopped). The difference between the ending volume and the starting volume is your endpoint volume. Use the endpoint volume for your molarity calculations (convert it to Liters).
After you repeat the dilute vinegar titration an additional two times, you will determine the molarity of the vinegar, not of the dilute vinegar. To do this, use the following equation: MaVa= 10 x MbVb (the 10 adjusts for the 10-fold dilution of the vinegar). The actual equation that is used to find the molarity of the acid is:
Ma= (10 x MbVb)/Va
The Ma value from this calculation is the molarity of the vinegar, not of the dilute vinegar solution used in the titrations. Determine the Ma for each of these three titrations. Average the three molarity values and show the average value (to 4 significant figures) to your instructor.
1Download and print the Titration Data Sheet that you will use for all your titration experiments, both manual and using ChemWorks. This data sheet is an Adobe Acrobat file, and you will need Acrobat reader (free online) to view and print.
2Phenolphthalein
is an organic compound (C20H14O4) used as an
acid-base indicator. The compound is colorless in acidic solution and pinkish
in basic solution (with the transition occurring around pH 9). Phenolphthalein
does not dissolve very well in water, so for titrations it is usually prepared
in alcohol solution. When adding a drop of indicator to an acid you will sometimes
detect a slight cloudy white color. This is actually a precipitate of solid
phenolphthalein, as the high local concentration exceeds the solubility product.
It will usually disappear if you shake the solution, since enough solvent becomes
available to dissolve the solute.
Go To Experiment:
1 2 3
4 5 6
7 8 9
10 11 12
Return to Chem110 Experiments Index
Copyright © Donald L. Robertson (Modified: 09/20/2006)